การทดสอบอย่างรวดเร็วของแอนติเจนสำหรับโรคโควิด-19 เป็นการทดสอบการไหลด้านข้างสำหรับการตรวจหาแอนติเจนของนิวคลีโอแคปซิดจาก SARS-CoV-2 ในเชิงคุณภาพในตัวอย่างไม้เช็ดจมูกด้านหน้าโดยตรงจากบุคคลที่สงสัยว่าติดเชื้อโควิด-19 ภายในเจ็ดวันแรกนับจากเริ่มแสดงอาการ. การทดสอบยังสามารถทดสอบสิ่งส่งตรวจจากบุคคลที่ไม่มีอาการได้.
วิธีทำการทดสอบอย่างรวดเร็วของแอนติเจนสำหรับโรคโควิด-19 (การทดสอบตัวเอง)
Prepare your test area
1. Do not eat or drink for 30 minutes before your test
2. You’ll need:
• a timer such as a watch or clock
• tissues
• a mirror
• surface cleaner
• hand sanitiser or soap and access to warm water.
1. Read this instruction guide carefully.
2. Immediately before starting the test, clear, clean and dry a flat surface to place the test kit on.
3. Wash your hands thoroughly for 20 วินาที, using soap and warm water, or hand sanitiser. If doing more than one test, clean the surface and rewash your hands between each test. Check your kit contents
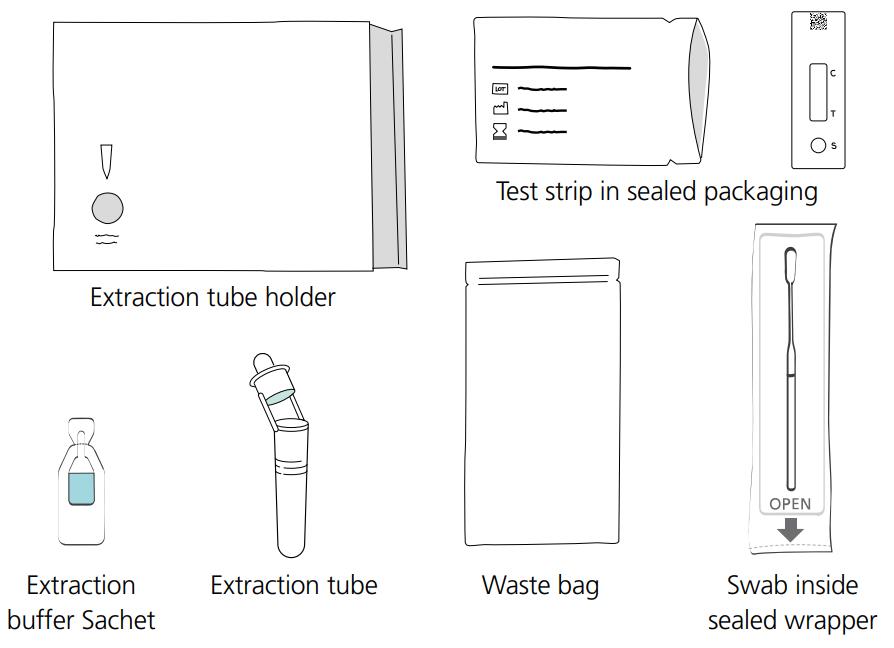
4. In your test box you should have:

Set up your test
5. Take the test strip out of the sealed bag and place it onto a clean flat surface.

คำเตือน
Once opened, start the test within 30 นาที.
6. Place the tube in the extraction tube holder attached inside the box.

7. Carefully twist or snap open the sachet. Open it away from your face and be careful not to spill any of the liquid.

8. Open the extraction tube and gently squeeze all of the liquid from the sachet into the tube. Take care not to touch the sachet against the tube. Place the sachet in the waste bag provided.

9. Gently blow your nose into a tissue and throw the tissue away in a closed bin. If you are testing a child help them to blow their nose. This is so that you get rid of excess mucus.
10. Wash your hands thoroughly again for 20 seconds using soap and warm water or hand sanitiser. If you’re doing this test on another person, you should both wash or sanitise your hands again.
11. Find the ไม้กวาด in the sealed wrapper in front of you. Identify the soft, fabric tip.
คำเตือน
Do not touch the soft, fabric tip of the swab.
12. Peel open the swab packaging only when you are ready to use and gently take out the swab.
Take your swab sample
คำเตือน
Do not touch the tongue, ฟัน, cheeks, gums or any other surfaces with the fabric tip of the swab. If it touches anything else, it may spoil your sample. Never touch the soft, fabric tip of the swab with your hands.
13. Open your mouth wide and rub the fabric tip of the swab over both tonsils (or where they would have been). Do this with good contact 4 times on each side (use a torch or a mirror to help you do this). Carefully remove the swab from the back of your throat.

14. Put the same swab gently into 1 nostril until you feel a slight resistance (about 2.5cm up your nose).

15. Gently wipe the swab around the inside of the nostril, making 10 complete circles. No force is needed. This may feel uncomfortable. Do not insert the swab any deeper if you feel strong resistance or pain.

Process the swab sample
Tip
For best performance, test the swab as soon as possible after wiping your nostril.
16. Pick up the extraction tube and place the fabric tip of the swab into the extraction tube, so its in the liquid. Press the tip against the inner edge of the extraction tube with force, while rotating
the swab for 15 วินาที. This is to transfer your sample into the liquid.

17. Pinch the extraction tube against the swab as you remove it. Make sure you remove all liquid from the soft tip of the swab. Place the swab in the waste bag

18. Press the cap tightly onto the extraction tube to avoid any leaks.

Advice
Wash your hands again after completing this step.
19. Ensure the test kit is on a clean and flat surface. Do not move the strip during the test.

20. Gently squeeze the extraction tube to place 2 drops of the liquid into the specimen well (ส) on the test strip. Make sure that you are dropping liquid and not an air bubble. Put the sample
collection vial in the waste bag along with the swab.

21. Set a timer and wait 30 minutes before you read your result.
A positive result can appear at any time after 20 นาที, however you should wait for the full 30 minutes to record a negative result as the test line (ต) may take this long to appear.

Read your result
สำคัญ
Do not leave the test to develop for longer than 30 minutes as this will make the result void.
• Positive result

Two lines appear. One coloured line should be in the control line region (ค), and another coloured line should be in the test line region (ต).
Two lines, one next to C and one next to T, even faint lines, show the test is positive.
• Negative result

One coloured line appears in the control line region (ค). No line appears in the test line region (ต).
• Void result
Control line (ค) fails to appear.

Dispose
After completing the test, wrap and seal all components of the test kit carefully and dispose properly.•
Record the result
Take a photo of the result if you are undergoing “StayHomeSafe” or are tested positive. The photo is needed for reporting.


